Turn your Figma designs into a video pipeline with Editframe and Node JS
Owing to its ease of collaboration, robust API ecosystem, and all-around excellent usability, Figma has become an industry-standard design tool for collaborative teams. While you might associate Figma with building user interface prototypes and mapping out user journeys, Figma is also catching on as a tool for developing video assets. While Figma may make it easier to collaborate on videos, rendering and distributing them at scale remains a challenge. Without an automated workflow in place, this process can easily add up to hours of tedious, labor-intensive work.
Thankfully, using the Editframe API and a few other simple tools, you can easily build an automated process for converting your video assets on Figma into files that you can easily distribute on Facebook and Instagram ads, TikTok, YouTube, and wherever else your customers and followers live.
This guide will walk through the process of building that automated workflows using Figma along with the developer-friendly tools Editframe and Node.js.
Tutorial Introduction
In this tutorial, we are going to build a Figma frame and convert it to an animated video using the Figma, Editframe, and Node JS. The GitHub repository for this project is also available here—feel free to clone and refer to it as you follow along with this tutorial.
Required tools
Before we begin, you will need:
- Node.js installed on your machine
- An Editframe API Token (you can create an account from this link)
- A Figma account (you can create one for free here)
Set up Figma
Note: These steps require you to have a Figma account.
- Log into your Figma account.
- Click on your profile icon and select “Settings.”
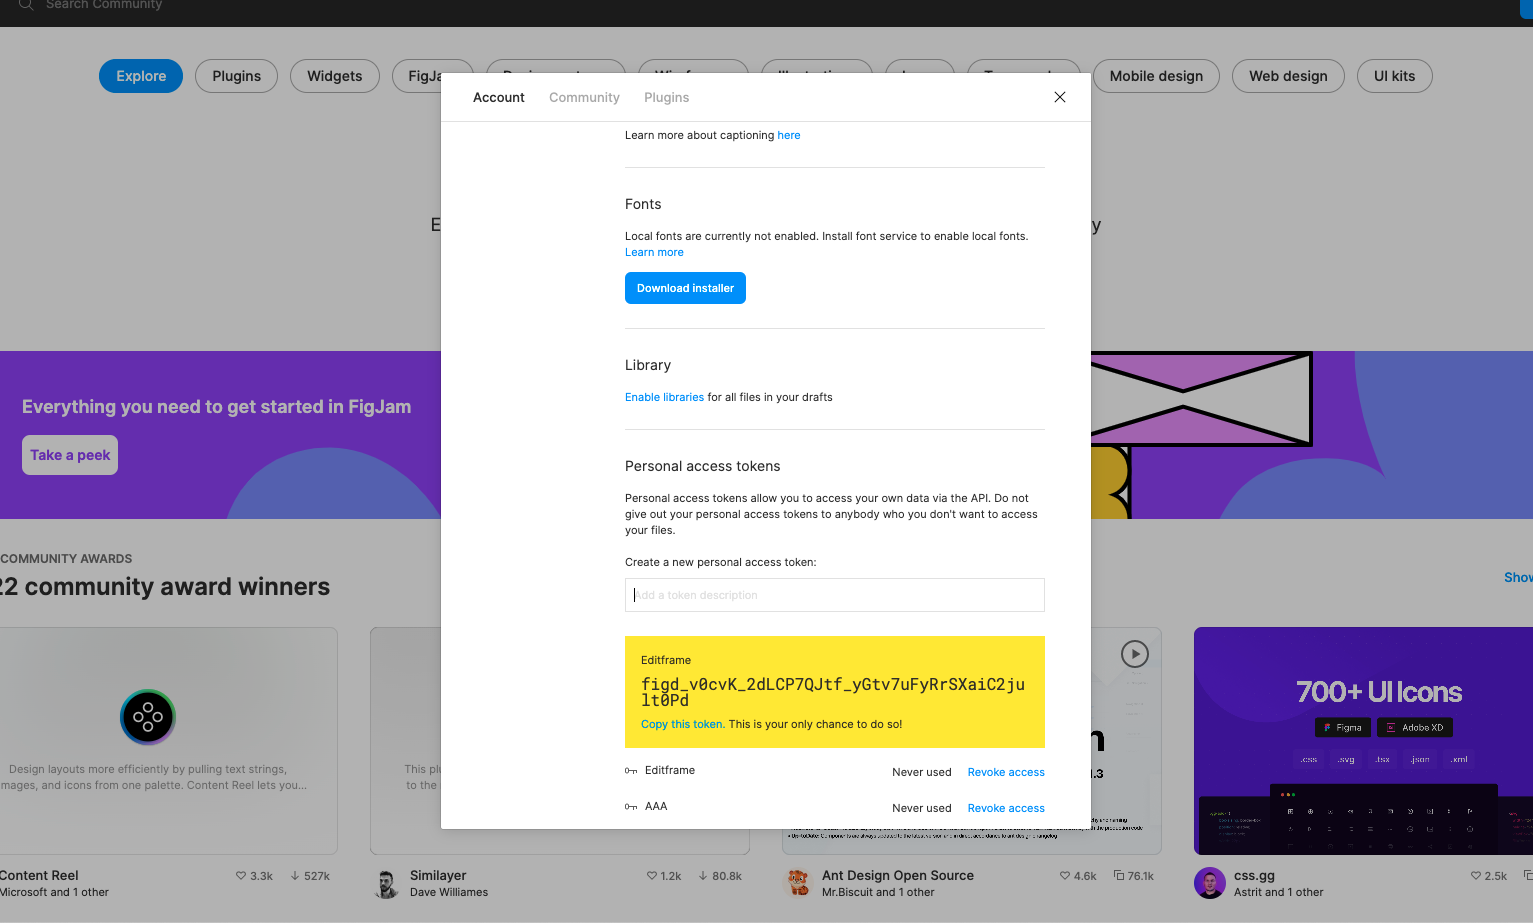
- In the Account section, scroll down until you see the “Personal access tokens” section.
- Enter a description for your token, then press Return. This will generate an access token for you to use with the Figma API (see screenshot below for reference).
- Open another browser tab.
- Open this Figma project, and click the “Get a copy” button to replicate it within your own Figma account.
Set up a Node.JS project
Now going to create a Node.js project:
- Create a new folder with the following terminal command:
mkdir figma-editframe-project
- Navigate into this new directory:
cd figma-editframe-project
- Initialize a Node.JS project with Yarn:
yarn init -y
- Use Yarn to install the Node-fetch@2 and dotenv modules:
yarn add node-fetch@2 dotenv
Try the Figma API
Now let’s familiarize ourselves with the Figma API so we can use it with our Node.JS project:
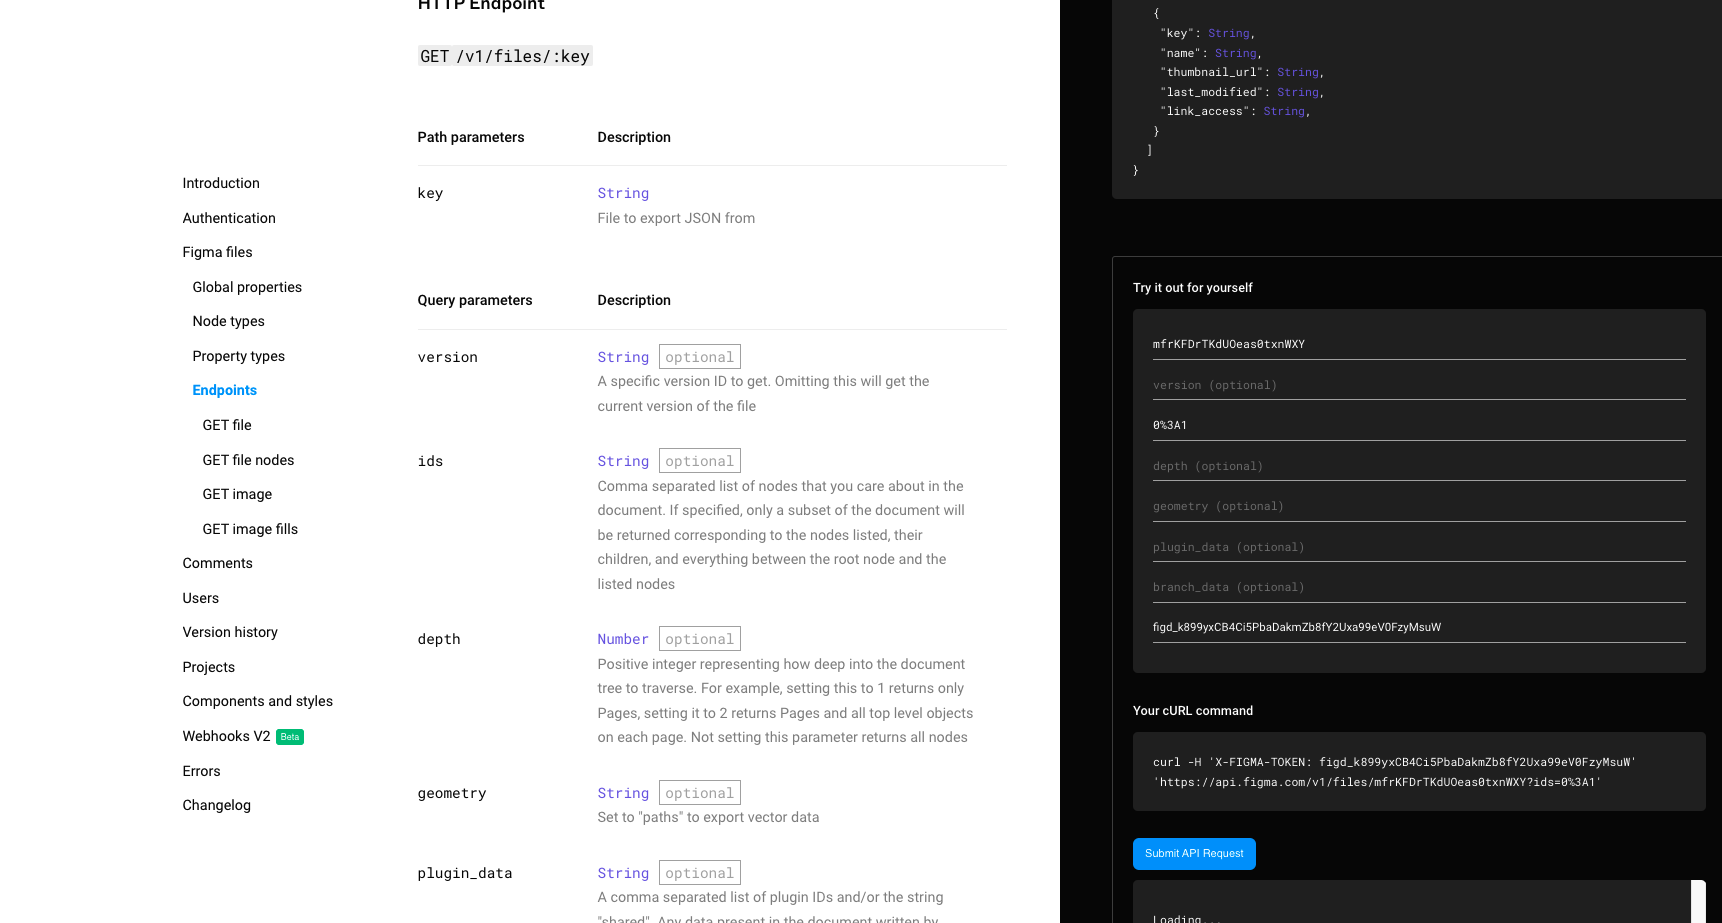
- Open the “Endpoints” section of the Figma API docs.
- Let’s add the needed parameters in a call to Figma’s GET API endpoint to retrieve the JSON data for this frame. Those are:
file_key: This identifies the Figma project we’re workign with. In our case, “mfrKFDrTKdUOeas0txnWXY” is the file key.ids: This identifies the selected frame or selection. In our case, we’ll include109%3A2, which specifies that we want the second story frame. If we didn’t include this, the response would include all frames.
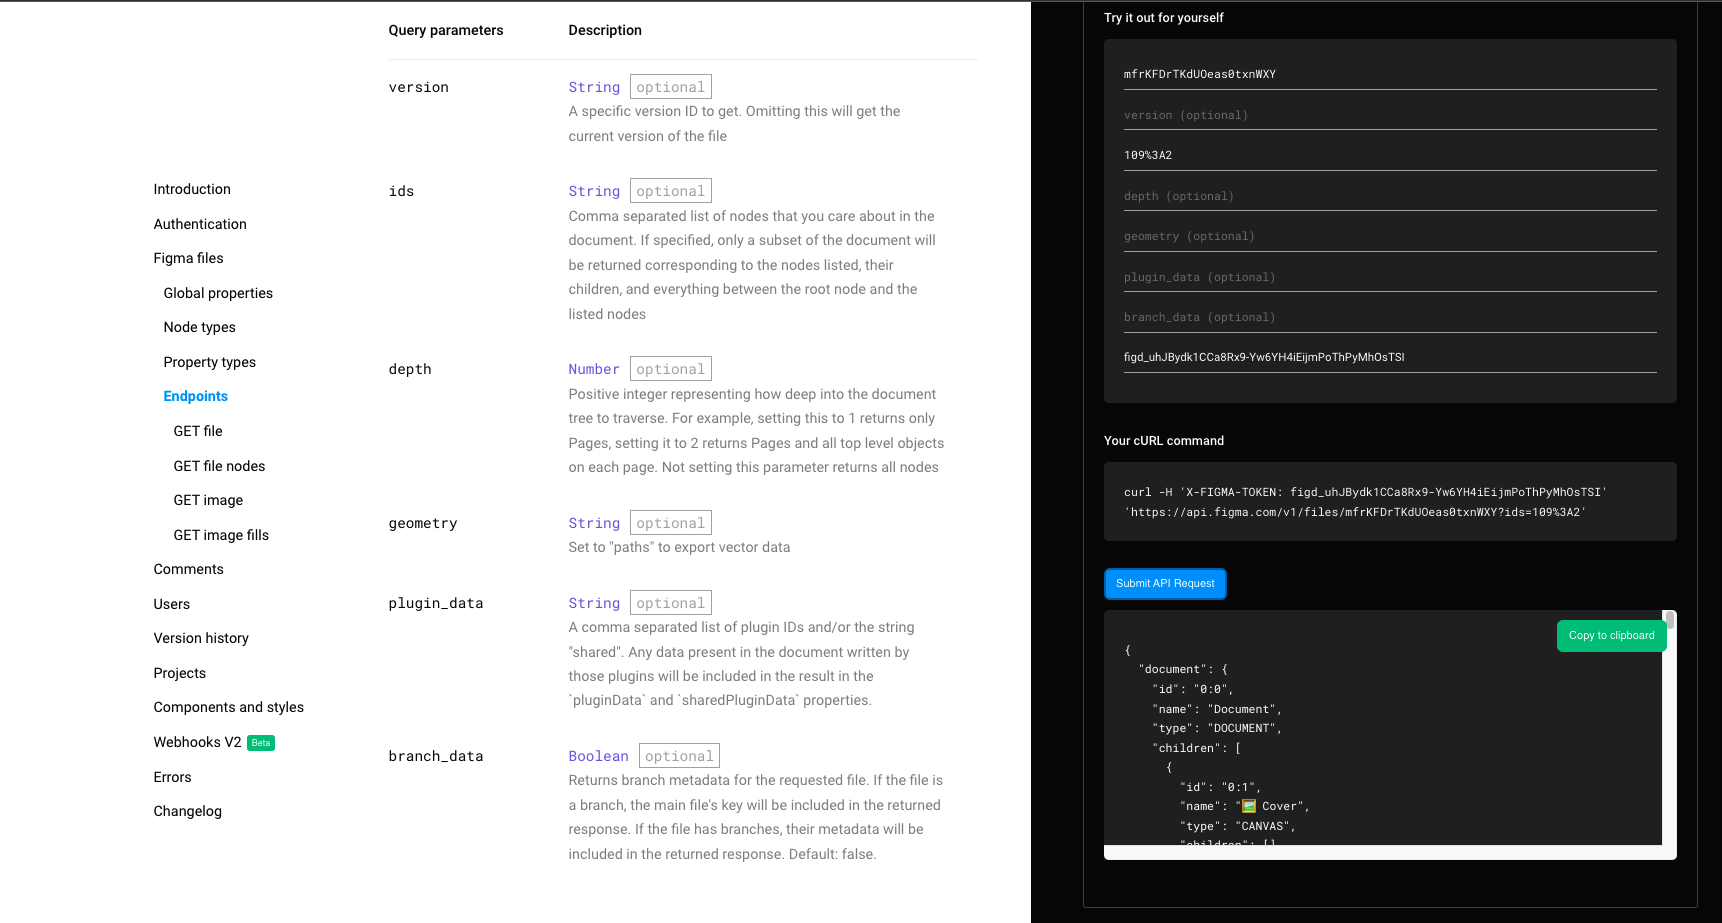
- Click “Submit API Request,” and you should see JSON data like in the screenshot below:
Continue building the Node.JS Project
- In your Node.js project, create a
src:
mkdir src
- Then add an
index.jsfile tosrc:
touch src/index.js
- Create a .env file in the root of your project folder, and add your Figma token as a variable:
FIGMA_TOKEN=YOUR_PERSONAL_FIGMA_ACCESS_TOKEN
- Paste this code into
src/index.jsto get your Figma API data:
require("dotenv").config({});
const fetch = require("node-fetch");

let options = {
  method: "GET",
  headers: { "X-FIGMA-TOKEN": process.env.FIGMA_TOKEN },
};

const getFigmaData = async (fileId, nodeId) => {
  let url = `https://api.figma.com/v1/files/${fileId}/nodes?ids=${nodeId}`;

  try {
    const res = await fetch(url, options);
    const json = await res.json();
    console.log(json);
  } catch (err) {
    console.error("error:" + err);
  }
};
getFigmaData("mfrKFDrTKdUOeas0txnWXY", "109%3A2");
- Run the script:
node src/index.js
When the script executes, you should see the Figma file data in your terminal in JSON format.
- Now let’s start parsing the Figma JSON data:
 const getFigmaData = async (fileId, nodeId) => {
  let url = `https://api.figma.com/v1/files/${fileId}/nodes?ids=${nodeId}`;

  try {
    const res = await fetch(url, options);
    const json = await res.json();
    for (const child of json.nodes[Object.keys(json.nodes)[0]].document
      .children) {
      console.log(child.type);
    }
  } catch (err) {
    console.error("error:" + err);
  }
};
In the code above, we loop through each node in the first frame array, and log the type of node we have in the frame to the console. When you run this script, you will see that you’re working with TEXT and RECTANGLE node types, which is what the Figma frame has. You can see this in the screenshot below.
- Let’s add some more code to our loop that will tell us more about our “TEXT” node:
const getFigmaData = async (fileId, nodeId) => {
  let url = `https://api.figma.com/v1/files/${fileId}/nodes?ids=${nodeId}`;

  try {
    const res = await fetch(url, options);
    const json = await res.json();
    for (const child of json.nodes[Object.keys(json.nodes)[0]].document
      .children) {
      if (child.type === "TEXT") {
        const text = child.characters;
        console.log({
          fontFamily: child.style.fontFamily,
          fontSize: child.style.fontSize,
          fontWeight: child.style.fontWeight,
          text,
        });
      }
    }
  } catch (err) {
    console.error("error:" + err);
  }
};
- Now let’s convert the Figma RGB color to a readable RGB color value:
const getFigmaData = async (fileId, nodeId) => {
  let url = `https://api.figma.com/v1/files/${fileId}/nodes?ids=${nodeId}`;

  try {
    const res = await fetch(url, options);
    const json = await res.json();
    const coordinates =
      json.nodes[Object.keys(json.nodes)[0]].document.absoluteBoundingBox;
    for (const child of json.nodes[Object.keys(json.nodes)[0]].document
      .children) {
      if (child.type === "TEXT") {
        const text = child.characters;
        const rgb = child.fills[0].color;
        const textColor = `rgb(${Math.round(rgb.r * 256)},${Math.round(
          rgb.g * 256
                )},${Math.round(rgb.b * 256)})`;

     console.log({
          fontFamily: child.style.fontFamily,
          fontSize: child.style.fontSize,
          fontWeight: child.style.fontWeight,
          text,
          color: textColor,
          fontFamily: child.style.fontFamily,
          fontSize: child.style.fontSize,
          fontWeight: child.style.fontWeight,
          x: child.absoluteBoundingBox.x - coordinates.x, // subtract node X value form main document X because node X is relative to main document and not the frame
          y: child.absoluteBoundingBox.y - coordinates.y, // subtract node Y value form main document Y because node Y is relative to main document and not the frame
          width: child.absoluteBoundingBox.width,
          height: child.absoluteBoundingBox.height,
        });
      }
    }
  } catch (err) {
    console.error("error:" + err);
  }
};
Now when you execute the script, you should see something like this in your console:
{
  fontFamily: 'Poppins',
  fontSize: 86,
  fontWeight: 700,
  text: 'Introduce your product in few words',
  color: 'rgb(31,31,31)',
  x: 86,
  y: 1414,
  width: 908,
  height: 206
}
Editframe API setup
Now we’re going to bring a new guest to the party: the Editframe API.
- Add the Editframe Node JS SDK:
yarn add @editframe/editframe-js
- Add the Client ID and API Token in the .env file:
TOKEN=EDITFRAME_TOKEN
CLIENT_ID=EDITFRAME_CLIENT_ID
- Now add this code to
src/index.jsto set up the Editframe API:
require("dotenv").config({});
const fetch = require("node-fetch");
const { Editframe } = require("@editframe/editframe-js");

let options = {
  method: "GET",
  headers: { "X-FIGMA-TOKEN": process.env.FIGMA_TOKEN },
};

// Init new Editframe instance
const editframe = new Editframe({
  clientId: process.env.CLIENT_ID,
  token: process.env.TOKEN,
});

const getFigmaData = async (fileId, nodeId) => {
  let url = `https://api.figma.com/v1/files/${fileId}/nodes?ids=${nodeId}`;

  try {
    const res = await fetch(url, options);
    const json = await res.json();
    const coordinates =
      json.nodes[Object.keys(json.nodes)[0]].document.absoluteBoundingBox;
    const bgColor =
      json.nodes[Object.keys(json.nodes)[0]].document.fills[0].color;

    // Create new video with duration of 3 seconds with frame width, height and bg color
    const composition = await editframe.videos.new({
      dimensions: {
        width: coordinates.width,
        height: coordinates.height,
      },
      duration: 3,
      backgroundColor: `rgb(${Math.round(bgColor.r * 256)},${Math.round(
        bgColor.g * 256
      )},${Math.round(bgColor.b * 256)})`,
    });
    for (const child of json.nodes[Object.keys(json.nodes)[0]].document
      .children) {
      if (child.type === "TEXT") {
        const text = child.characters;
        const rgb = child.fills[0].color;
        const textColor = `rgb(${Math.round(rgb.r * 256)},${Math.round(
          rgb.g * 256
                )},${Math.round(rgb.b * 256)})`;
        // Add new text layer to the video with data from Figma API
        await composition.addText(
          {
            color: textColor,
            fontFamily: child.style.fontFamily,
            fontSize: child.style.fontSize,
            fontWeight: child.style.fontWeight,
            text,
            backgroundColor: "#0968af",
          },
          {
            position: {
              x: child.absoluteBoundingBox.x - coordinates.x,
              x: child.absoluteBoundingBox.y - coordinates.y,
            },
            trim: {
              end: 3,
            },
          }
        );
      }
      // Encode video synchronously, you can encode video async by listening to webhook events in your editframe application
      console.log(await composition.encodeSync());
    }
  } catch (err) {
    console.error("error:" + err);
  }
};
getFigmaData("mfrKFDrTKdUOeas0txnWXY", "109%3A2");
- Now let’s add support for the Figma image nodes, and add the image for the Editframe composition:
require("dotenv").config({});
const fetch = require("node-fetch");
const { Editframe } = require("@editframe/editframe-js");

let options = {
  method: "GET",
  headers: { "X-FIGMA-TOKEN": process.env.FIGMA_TOKEN },
};
// Init new Editframe instance
const editframe = new Editframe({
  clientId: process.env.CLIENT_ID,
  token: process.env.TOKEN
});

const getImageDetails = async (imageRef, fileId) => {
  let url = `https://api.figma.com/v1/files/${fileId}/images`;
  // Get all images url inside of a figma file
  const res = await fetch(url, options);
  const json = await res.json();
  // return specifc image that we're looking for by reference
  return json.meta.images[imageRef];
};

const getFigmaData = async (fileId, nodeId) => {
  let url = `https://api.figma.com/v1/files/${fileId}/nodes?ids=${nodeId}`;

  try {
    const res = await fetch(url, options);
    const json = await res.json();
    const coordinates =
      json.nodes[Object.keys(json.nodes)[0]].document.absoluteBoundingBox;
    const bgColor =
      json.nodes[Object.keys(json.nodes)[0]].document.fills[0].color;

    // Create new video with duration of 3 seconds with frame width, height and bg color
    const composition = await editframe.videos.new({
      dimensions: {
        width: coordinates.width,
        height: coordinates.height,
      },
      duration: 3,
      backgroundColor: `rgb(${Math.round(bgColor.r * 256)},${Math.round(
        bgColor.g * 256
      )},${Math.round(bgColor.b * 256)})`,
    });
    for (const child of json.nodes[Object.keys(json.nodes)[0]].document
      .children) {
      if (child.type === "TEXT") {
        const text = child.characters;
        const rgb = child.fills[0].color;
        const textColor = `rgb(${Math.round(rgb.r * 256)},${Math.round(
          rgb.g * 256
                )},${Math.round(rgb.b * 256)})`;
        // Add new text layer to the video with data from Figma API
        await composition.addText(
          {
            color: textColor,
            fontFamily: child.style.fontFamily,
            fontSize: child.style.fontSize,
            fontWeight: child.style.fontWeight,
            text,
          },
          {
            position: {
              x: child.absoluteBoundingBox.x - coordinates.x,
              x: child.absoluteBoundingBox.y - coordinates.y,
            },
            trim: {
              end: 3,
            },
          }
        );
      } else if (child.type === "RECTANGLE") {
        // Image will be inside of parent node as fills array
        child.fills.forEach(async (fill) => {
          if (fill.type === "IMAGE") {
            // We retrieve image by ref using figma API
            const image = await getImageDetails(fill.imageRef, fileId);
            const { x, y, width, height } = child.absoluteBoundingBox;
            if (image) {
              // Add image layer to the video
              await composition.addImage(image, {
                position: {
                  x: x - coordinates.x,
                  y: y - coordinates.y,
                },
                size: {
                  width,
                  height,
                },
                trim: {
                  end: 3,
                },
              });
            }
          }
        });
      }
    }
    // Encode video synchronously, you can encode video async by listening to webhook events in your editframe application
    console.log(await composition.encodeSync());
  } catch (err) {
    console.error("error:" + err);
  }
};
getFigmaData("mfrKFDrTKdUOeas0txnWXY", "109%3A2");
Set up Express Server (Optional)
- Install Express as a dependency:
yarn add express
- Create a
server.jsfile in the root folder. This is where we’ll initialize the Express server and add the API route:
const express = require("express")
const routes = require("./routes")

function createServer() {
    const app = express()
    app.use(express.json())
    app.use("/api", routes)
    return app
}

module.exports = createServer
- Create a
routes.jsfile in the root folder. Here, we’ll establish a POST API endpoint that acceptsfileIdandnodeIdas the request body, and executes ourgetFigmaDatafunction with these two arguments:
const express = require("express");
const router = express.Router();
const { getFigmaData } = require("./src/index");
router.post("/figma", async (req, res) => {
  const { fileId, nodeId } = req.body;
  try {
    if (!fileId || !nodeId) {
      return res.status(500).send({ error: "Invalid file id or node id" });
    }
    const video = await getFigmaData(fileId, nodeId);
    return res.status(201).send({ video });
  } catch (err) {
    return res.status(500).send({ error: err });
  }
});

module.exports = router;
- Now, create a
main.jsfile in the root folder. This is where we’ll import the express server instance, and add listeners for port 5000.
const express = require("express");
const createServer = require("./server"); // new line

const app = createServer(); // new line
app.listen(5000, () => {
  console.log("Server has started!");
});
- Update the
package.jsonfile with the start script:
{
  "name": "figma-use-case-editframe",
  "version": "1.0.0",
  "main": "index.js",
  "license": "MIT",
  "scripts": {
    "start": "node main", // new line
  },
  "dependencies": {
    "@editframe/editframe-js": "^3.0.0",
    "dotenv": "^16.0.1",
    "express": "^4.18.1",
    "node-fetch": "2",
  },
  "devDependencies": {
    "nodemon": "^2.0.18"
  }
}
- Run start script:
yarn start
- Run the curl request:
 curl --request POST \
  --url http://localhost:5000/api/figma \
  --header 'Content-Type: application/json' \
  --data '{
	"fileId":"mfrKFDrTKdUOeas0txnWXY",
	"nodeId":"109%3A2"
}'
Conclusion and Next Steps
Now that we have the basics of this project laid out, you can continue building upon this foundation and add other functionality to your app. You can take what you learned here to create any video processing app you would like to have.
Here’s the final Github Repo, clone it and have fun!